If Windows users seeing the “D3dx9_43.dll is missing” error on PCs, it means a problem that needs addressing. This error often occurs when launching applications that require DirectX. Since DirectX is essential for gaming on Windows, encountering this error can prevent your games from running properly. Fortunately, by following the methods outlined in this article, you can quickly resolve the issue and restore DirectX functionality, effectively fixing the “D3dx9_43.dll is missing” error.
What is D3dx9_43.dll?
D3dx9_43.dll is a component of DirectX 9, primarily used in graphics and multimedia applications, particularly in game development. It provides developers with a range of functions and tools to implement complex 3D graphics effects and audio processing. In short, d3dx9_43.dll is a crucial component for the proper functioning of games and applications that rely on DirectX 9.
Why Does the D3dx9_43.dll Missing Error Occur?
The d3dx9_43.dll error can arise when the file is corrupted, deleted, or placed in the wrong location, preventing applications that require it from launching. Common error messages include:
- C:\WINDOWS\SYSTEM32\d3dx9_43.dll is either not designed to run on Windows or it contains an error.
- The code execution cannot proceed because d3dx9_43.dll was not found. Reinstalling the program may fix this problem.
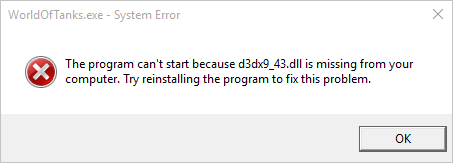
- The program can’t start because d3dx9_43.dll is missing from your computer. Try reinstalling the program to fix this problem.
There are several reasons why d3dx9_43.dll might be lost or damaged. If temporary glitches or background processes are not the cause, consider the following scenarios:
- Malware Infection: Certain viruses or malicious software can target system files, potentially corrupting, deleting, or replacing the d3dx9_43.dll file.
- Improper Uninstallation: When uninstalling games or applications that rely on DirectX, the system may mistakenly delete the d3dx9_43.dll file.
- Incomplete Installation: If the installation process for a game or application is interrupted or encounters errors, the d3dx9_43.dll file may not be installed correctly.
- Operating System Updates: Updates to specific operating systems can alter or replace system files, potentially resulting in the deletion or corruption of the original d3dx9_43.dll file.
- Driver Updates: If graphic driver updates are incompatible with certain components of DirectX, the DLL file may cease to function properly.
- User Error: Users may inadvertently delete the d3dx9_43.dll file while managing files or performing system cleanups, mistakenly identifying it as unnecessary.
Understanding these causes can help users more effectively identify and resolve issues when faced with the d3dx9_43.dll error.
How to Fix the D3dx9_43.dll Missing Error on Windows
Method 1: Restart Your Computer
As mentioned earlier, the d3dx9_43.dll error can sometimes stem from temporary glitches or background processes running on your computer. Restarting your system can often resolve these issues by resetting memory and resources, thereby terminating any problematic programs. This can restore access to the d3dx9_43.dll file, allowing applications to function correctly again.
Method 2: Copy the Missing D3dx9_43.dll File from Another Computer
If you frequently encounter the “d3dx9_43.dll not found” error, copying the file from another computer can help resolve the issue. While some websites offer this file for free download, it’s important to be cautious, as some may be malicious. The safest approach is to copy the file from a friend’s computer or your own device.
However, keep in mind that if your friend’s computer does not have the file or if the versions of Windows differ, this method may not always be successful.
Method 3: Use a DLL Fixer
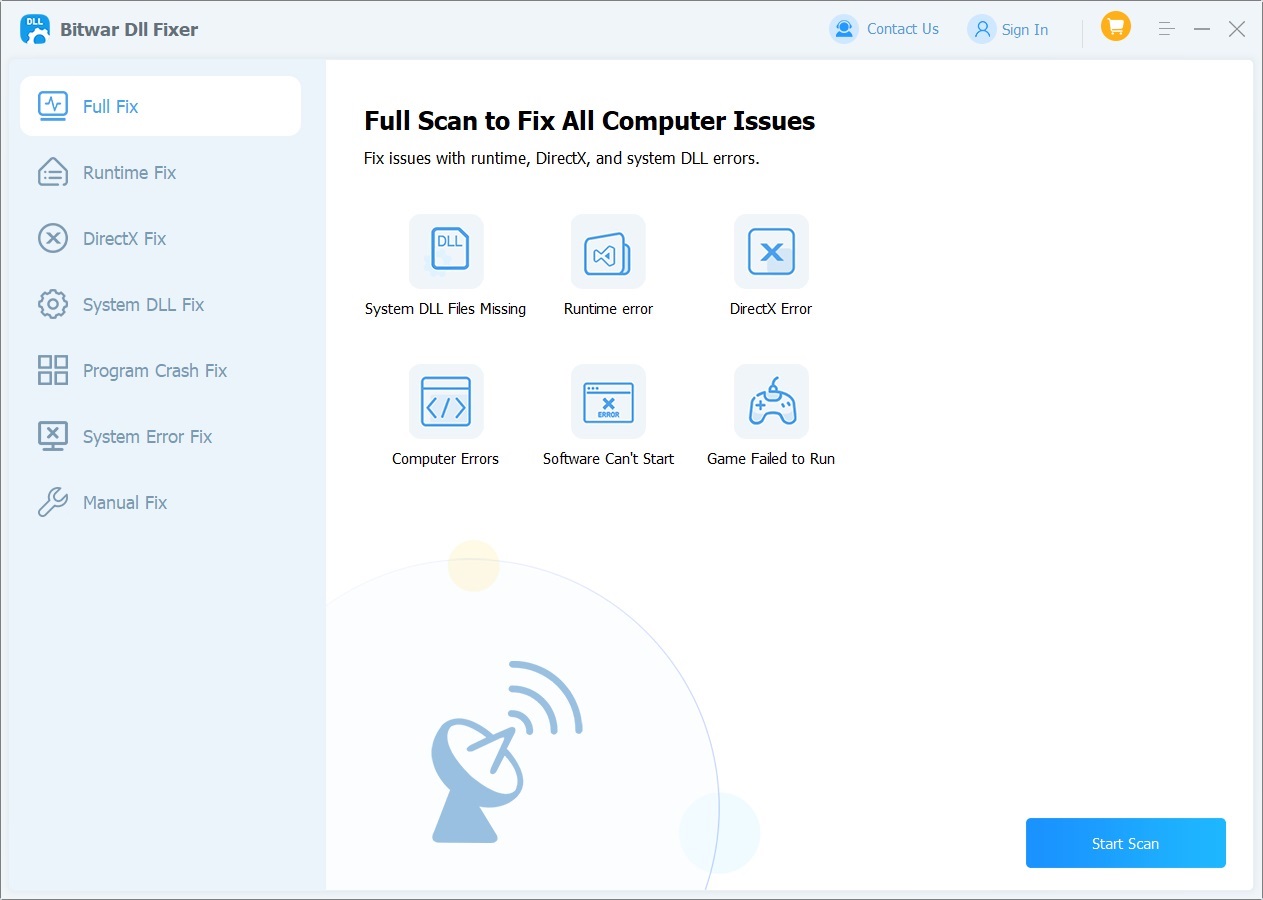
If you want to quickly and effectively fix the d3dx9_43.dll missing error, consider using a professional data recovery tool. Bitwar DLL Fixer is a powerful option that features an extensive database of DLL files. It automatically scans your system to identify any missing or corrupted DLL files and reinstalls them in the appropriate application directory. By using this tool, you can eliminate the hassle of manually placing files into folders, leading to improved application stability and overall system performance.
Benefits of Bitwar DLL Fixer Software:
- Easily fix or replace corrupted, damaged, or missing DLL files with a single click.
- Recover lost DirectX files and runtime libraries efficiently.
- Enjoy a reliable solution with a strong success rate and free technical support.
- Use the tool without any special technical knowledge or manual adjustments.
- Quickly scan your computer to identify DLL errors causing program issues.
- Resolve launch problems for Windows programs and games promptly.
Follow the steps below to use Bitwar DLL Fixer to restore the d3dx9_43.dll file.
Bitwar DLL Fixer Official: https://www.bitwarsoft.com/dll-fixer
Free Download Bitwar DLL Fixer:

Steps to Repair DLL Files Using Bitwar DLL Fixer
- Download and launch Bitwar DLL Fixer. Select “Full Fix” from the left panel.

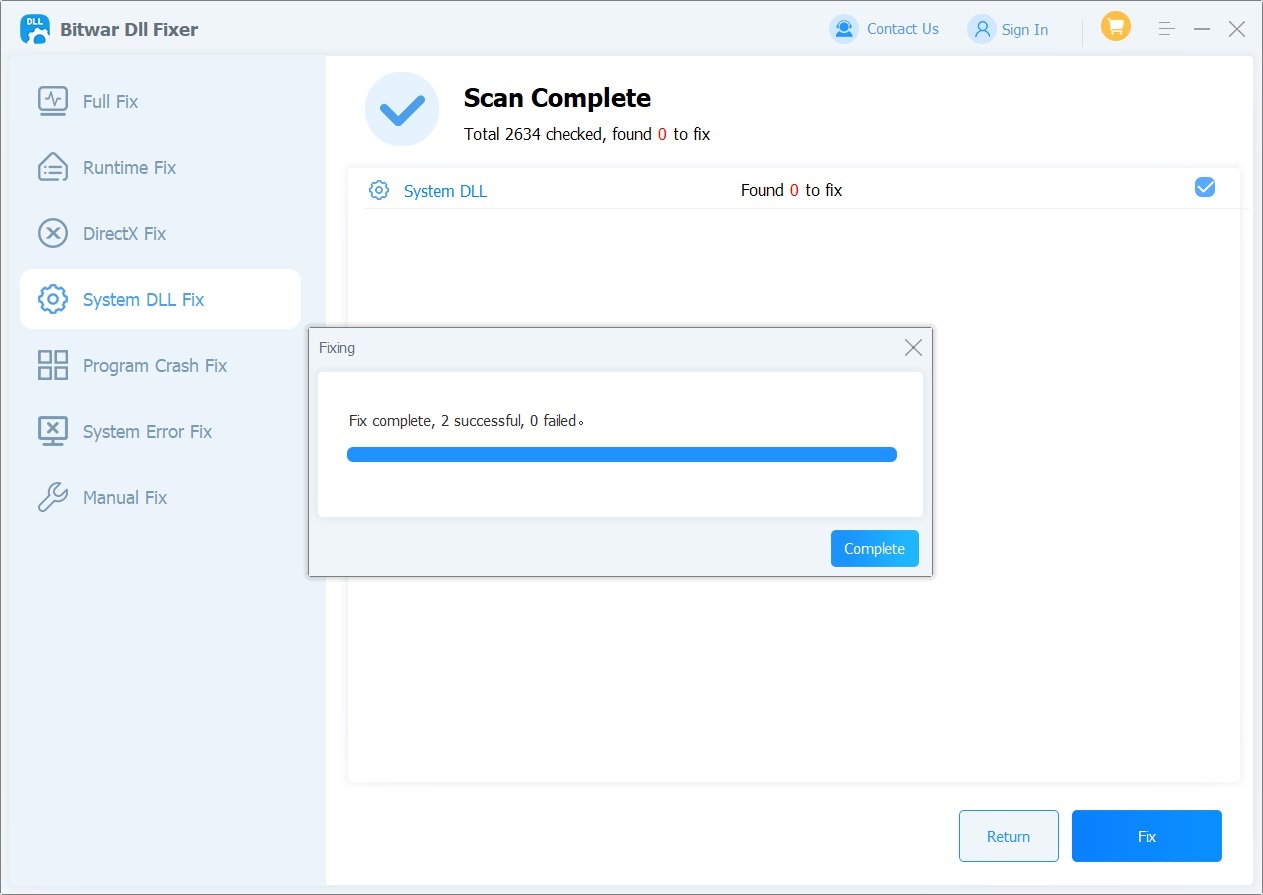
- Click “Start Scan” and wait for the scan to complete. Review the listed DLL files and click the “Fix” button to fix the identified DLL files.
- Once the fix is finished, a notification will appear. Check if the issue is resolved by launching the related program.
Method 4: Download DirectX Components
Since D3dx9_43.dll is part of DirectX, you can try installing the DirectX components to restore the d3dx9_43.dll file. DirectX enables applications to communicate with graphics cards, facilitating various tasks such as multimedia playback and game programming.
In simple terms, it is essential for the proper functioning of most games and applications. Follow the steps below to install DirectX:
- Search online for “DirectX installation package” and download it.
- Once the download is complete, run the installation file and follow the on-screen instructions to complete the installation.
- Restart your computer to apply the changes.
If you want to verify that DirectX is installed correctly, follow these steps:
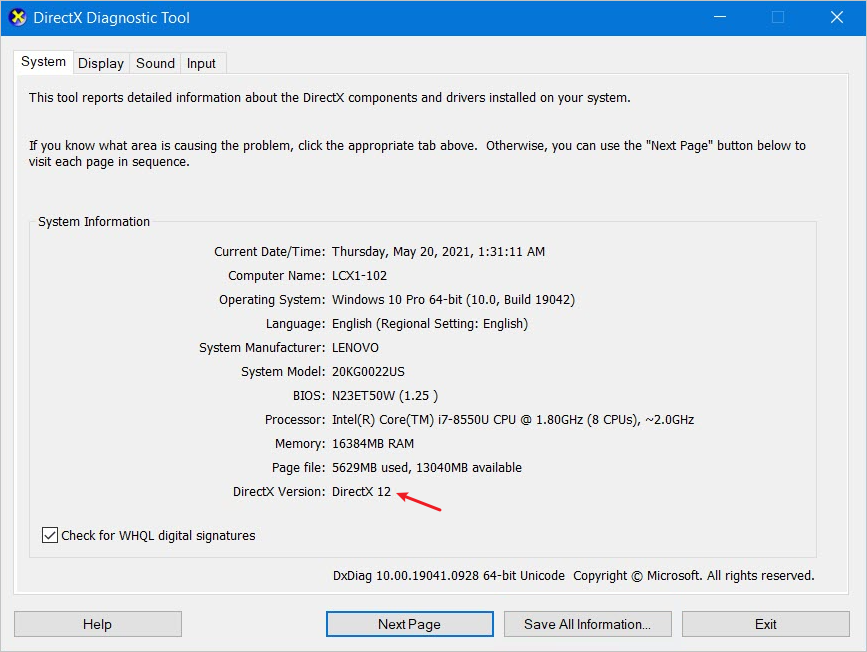
- Type “dxdiag” into the search box and press Enter.
- When the DirectX Diagnostic Tool window opens, select the System tab to check the current version of the DirectX API installed on your computer.
After completing these steps, launch the problematic game or application to see if the error has been resolved.
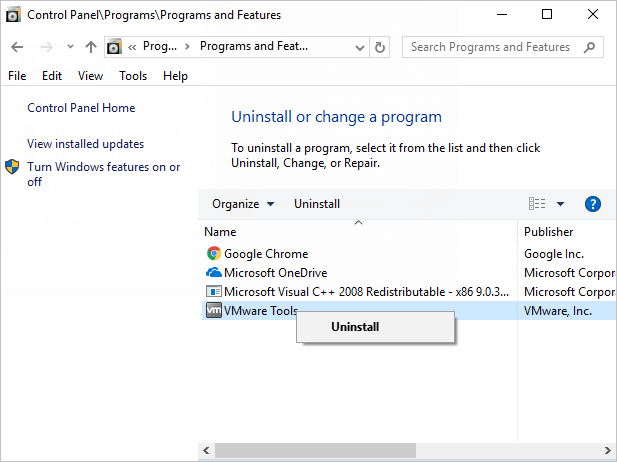
Method 5: Reinstall the Problematic Application
If the issue remains unresolved, consider reinstalling the problematic application. The error may stem from the application itself, occurring without any clear reason. To reinstall the application, follow these steps:
- Open Windows and navigate to “Control Panel.”
- Click on “Uninstall a program.”
- Find and select the relevant program, then click “Uninstall.”
- To ensure the program is completely uninstalled, choose “Restart” before installing any compatible updates.
- Restart your computer and test to see if the program operates correctly.
Method 6: Run an SFC Scan
Windows includes a useful tool called the System File Checker (SFC). This feature detects and repairs missing or corrupted system files, such as D3dx9_43.dll. Accessible through the Command Prompt, SFC helps maintain system integrity. By using it, you can prevent application errors and crashes, improving overall system stability and ensuring a smoother user experience.Open the
- Run Command Prompt as an administrator.
- Type “sfc /scannow” and press Enter.
- Wait for the command to complete, then close the Command Prompt window and restart your system.
- After the restart, launch the application again to check if the D3dx9_43.dll not found issue has been resolved.
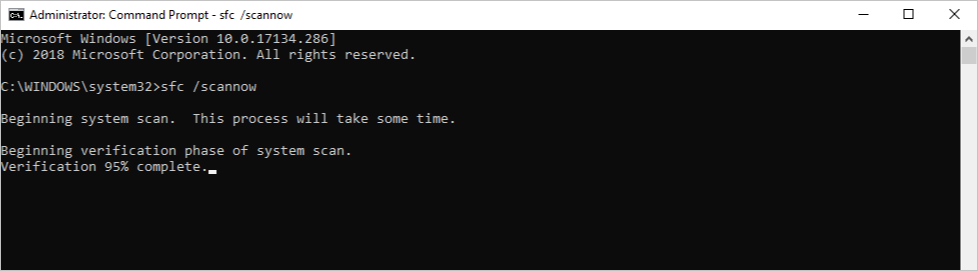
Once the scan is complete, the problem with the missing d3dx9_43.dll should be fixed. If the issue persists, you may need to perform a DISM scan.
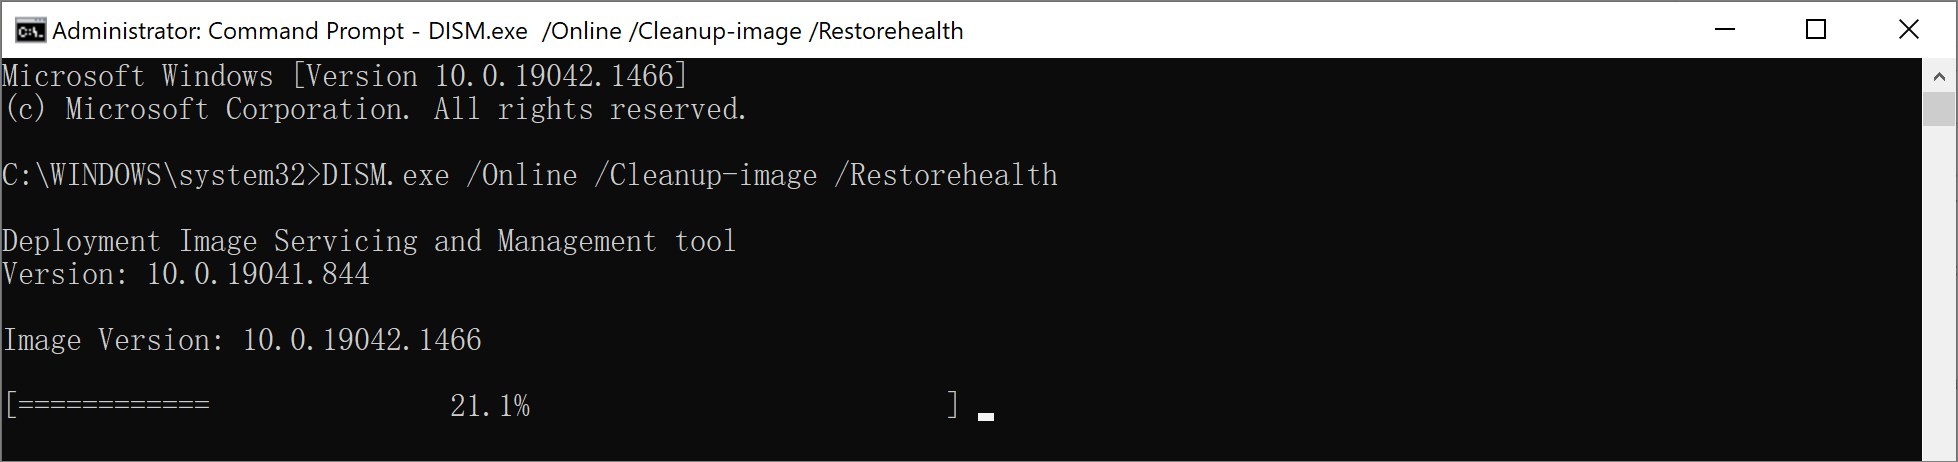
Method 7: Run a DISM Scan
- Run Command Prompt as an administrator.
- Enter the following commands one by one, pressing Enter after each line to execute them:
Dism /Online /Cleanup-Image /ScanHealth
Dism /Online /Cleanup-Image /CheckHealth
Dism /Online /Cleanup-Image /RestoreHealth - Once the DISM process is complete, restart your computer and check if the D3dx9_43.dll crash error has been resolved.
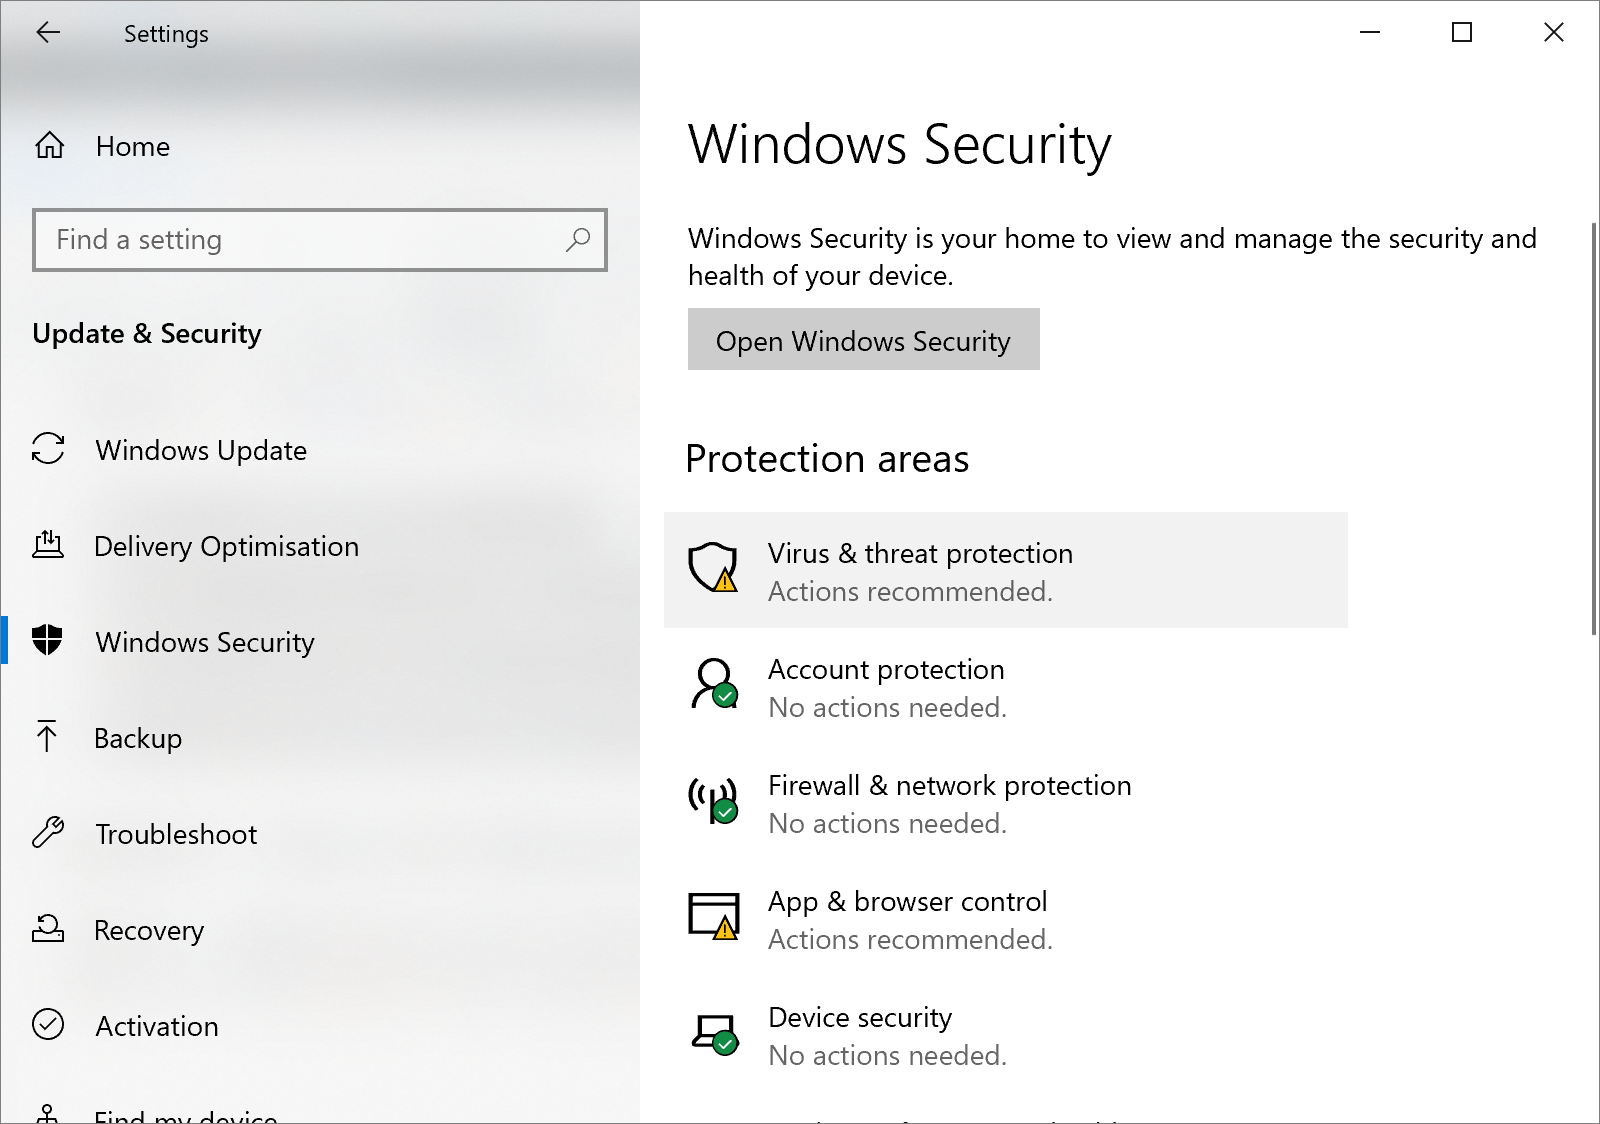
Method 8: Scan for Malware
According to security experts, some infected PCs can trigger D3DX9_43.dll errors. Additionally, the errors displayed may be caused by malicious programs masquerading as this file. Follow these steps to access Windows Defender to check for viruses or malware on your computer.:
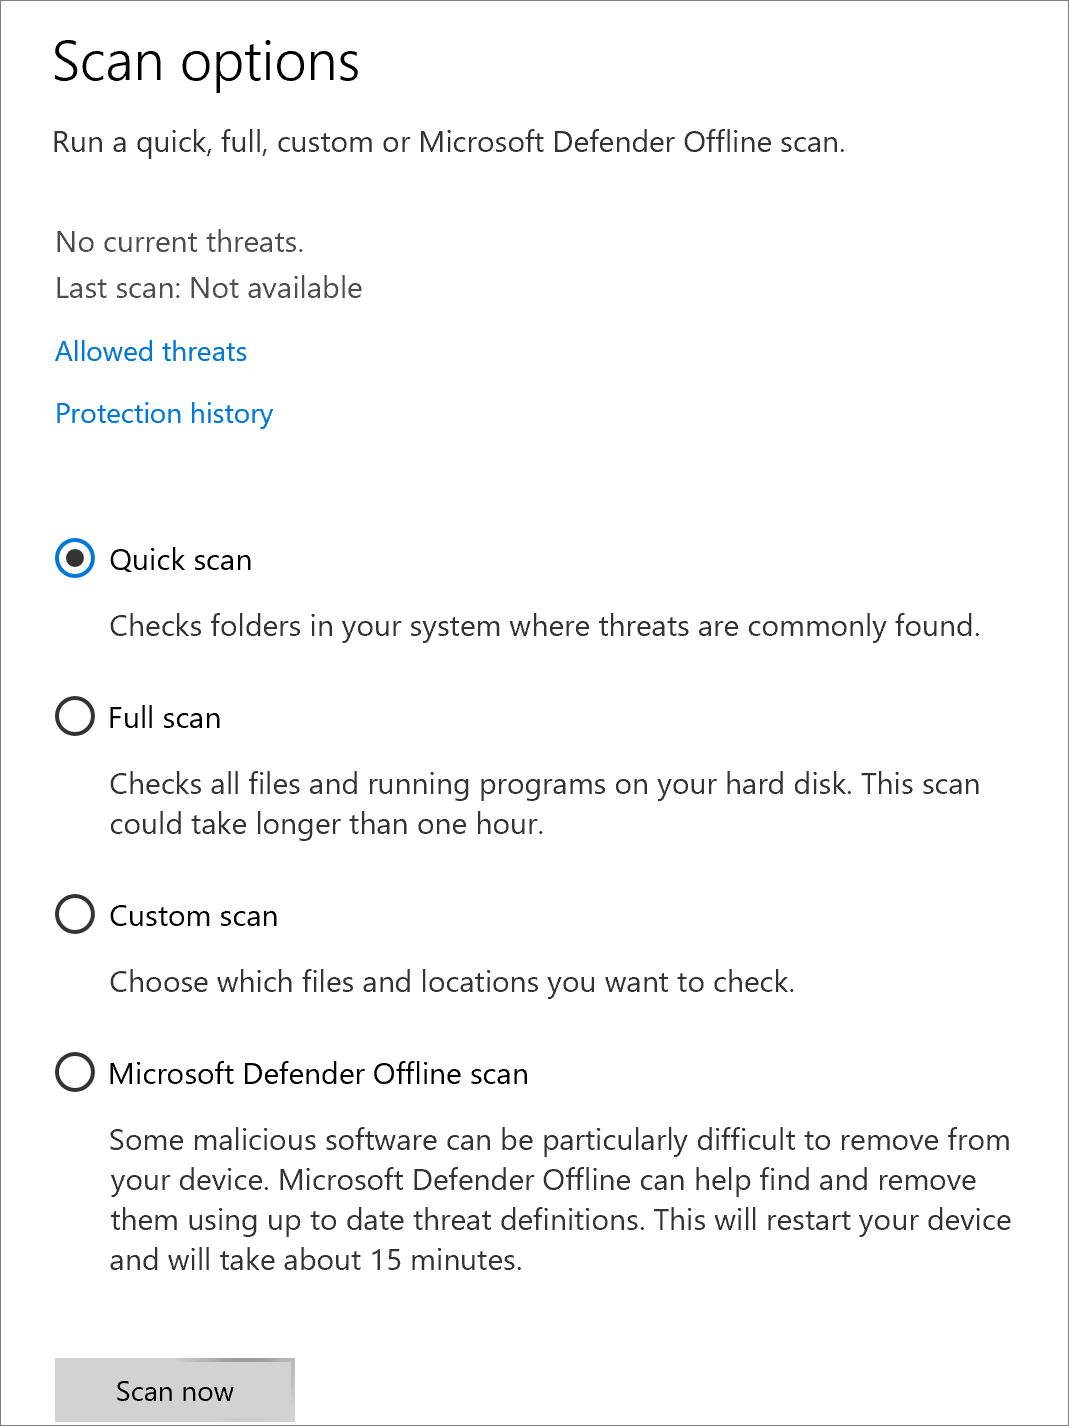
- Press “Ctrl+I” to open Windows Settings, then select “Update & Security” > “Virus & threat protection”.
- Then click on “Scan options”.
- On the Scan Options window, choose”Microsoft Defender Offline scan” and click “Scan now”.
- This will cause your computer to restart immediately and initiate a deep scan.
Method 9: Update Windows
Keeping Windows updated is essential for downloading necessary components for Windows applications, DirectX, and third-party applications like Microsoft Visual C++. It can also help restore missing DLL files. Follow these steps to update Windows:
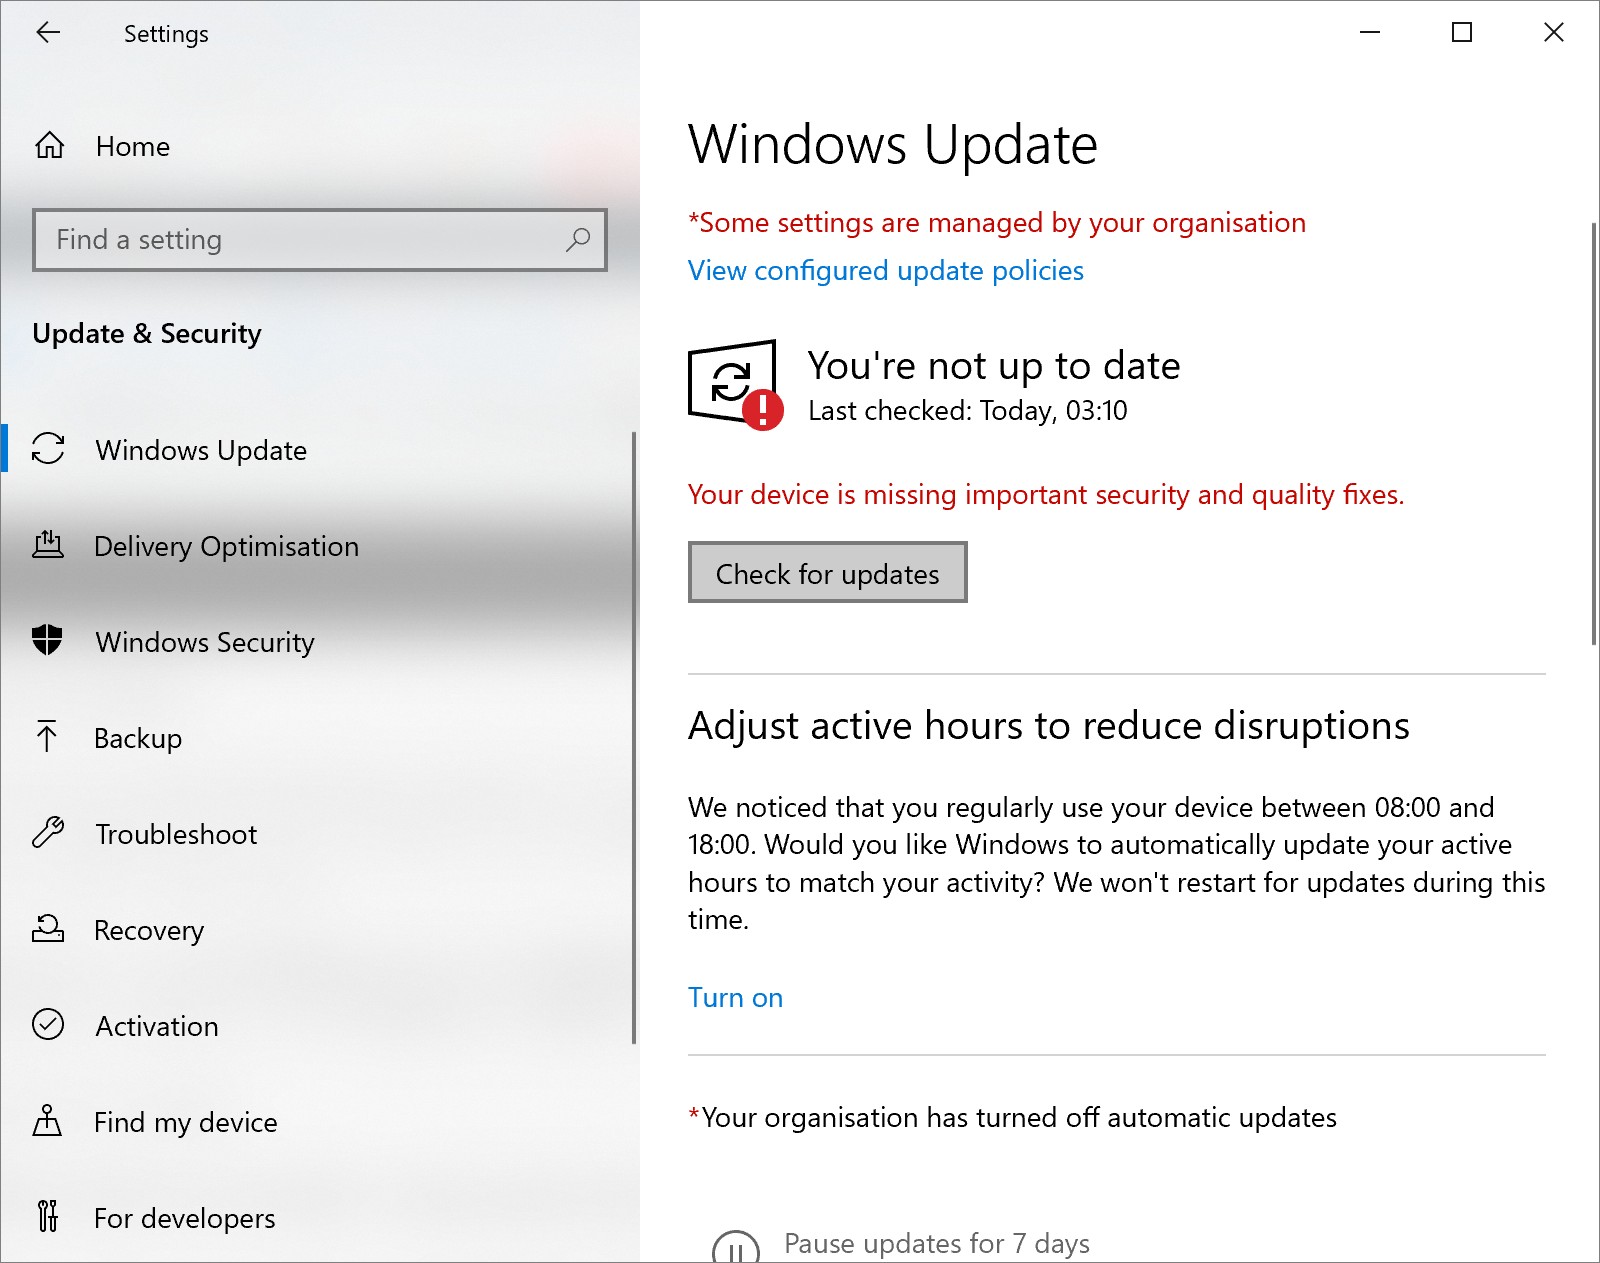
- Press “Ctrl+I” to open Windows Settings, then select “Update & Security”.
- Navigate to “Windows Update” and click “Check for updates”.
- If a new Windows update is available, a Download and install button will appear. Click “Install now” and follow the on-screen instructions to install the latest updates. Once this process is complete, your system will be up to date.
Method 10: Perform a System Restore
The d3dx9_43.dll file is located in the Windows System32 folder and can be restored using the System Restore utility. System Restore is a troubleshooting tool that requires you to create restore points when the system is functioning properly.
When a restore point is created, system files, drivers, and registry files are saved at that point. This allows users to revert Windows to a previous state in case of unexpected issues. If you have already created a restore point, follow these steps:
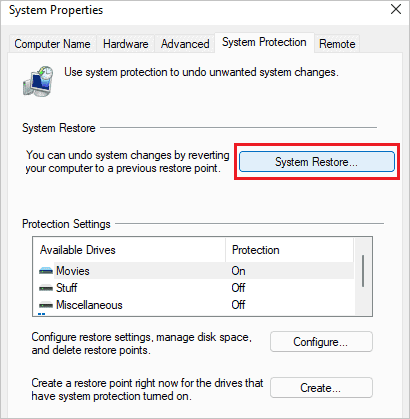
- Type “Create a restore point” in the search bar and select the top result to open the System Properties page.
- In the System Properties window, click the “System Restore” button.
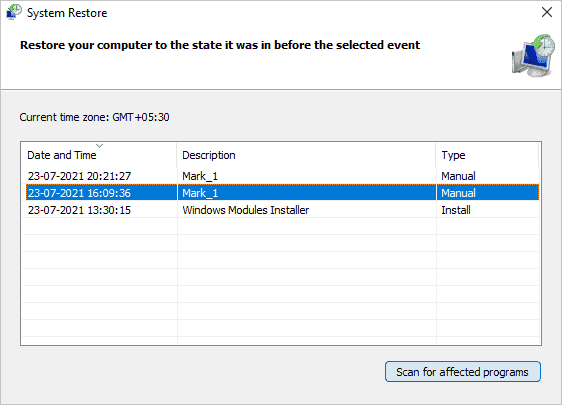
- Click the “Next” button and select Restore Point you wish to use to undo changes. You can click the “Scan for affected programs” button to see which applications will be removed as a result of this restoration.
- Click “Next” and then “Finish” to complete the restoration process.
- After you finish these steps, your system will revert to the selected restore point, potentially resolving any issues caused by recent changes.
Conclusion
Here is all the information about d3dx9_43.dll, including its definition, potential causes of errors, and ten methods to resolve any issues related to it. If you encounter the d3dx9_43.dll missing error, you can follow the methods mentioned above to fix it according to your preferences.