
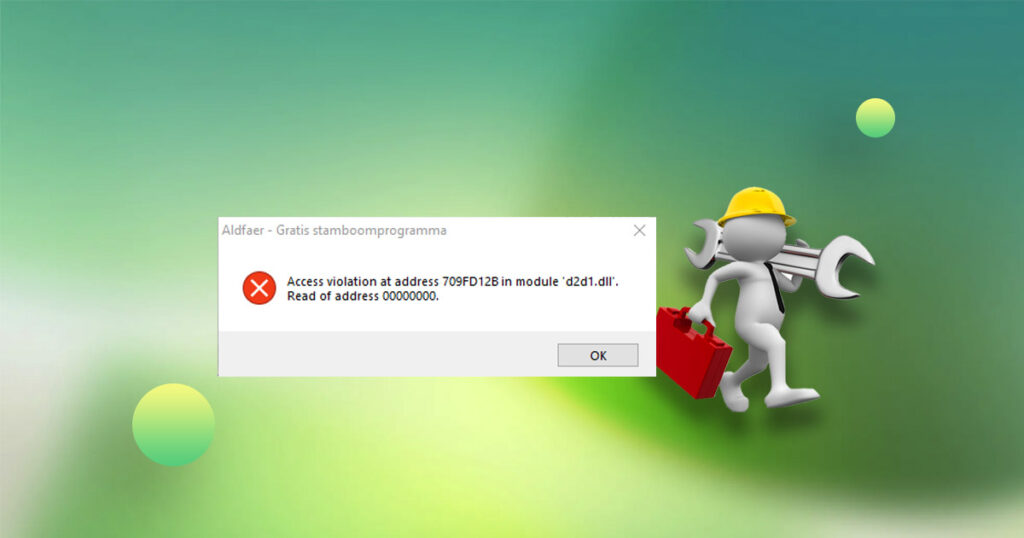
I’m not able to open Windows live mail and Photo because it says “windows\system32\d2d1.dll is either not designed to run or contains an error” error code 0xc000012f.
When I went to turn on my laptop I was surprised with a ‘bad Image error’ pop-up along with windows/system32/d2d1.dll. I can’t even open up internet explorer! I have no idea what this is or how to fix it! I just want my laptop back!
What is d2d1.dll and how can I fix PC problems caused by d2d1.dll errors?
What is d2d1.dll?
d2d1.dll is a Dynamic Link Library (DLL), designed to share functions and resources among various programs.
The system file d2d1.dll is an important file stored in the Windows system folder, typically created automatically during the operating system installation process. It is a way for Microsoft to implement the concept of shared function libraries within the Microsoft Windows operating system. This type of file encapsulates a large amount of code that is essential for the normal operation of the system. It is generally not recommended for users to arbitrarily modify such files (like d2d1.dll). Its presence plays a significant role in maintaining the stability of the computer system.
Why does d2d1.dll error or become missing?
Many users encounter d2d1.dll errors or missing issues when playing single-player games or installing software. The main reasons for this are that the d2d1.dll file in your computer system is missing or that certain dynamic link libraries required by some system software platforms are not installed. The d2d1.dll file may be missing due to accidental deletion, may have been uninstalled as a shared file by another program (shared with Microsoft Office Access 2010), or may have been corrupted or deleted due to infection by malicious programs such as account-stealing Trojans or rogue software.
Once antivirus software deletes the infected files, it can lead to the absence of related components, preventing common software like games from functioning properly. Therefore, it is crucial to ensure that antivirus software is kept up to date and regularly scanned.
- Cannot delete desktop icons
- Online games won’t open
- Computer randomly blue screens
- No sound from the computer
- Desktop fails to display
- Homepage modified to a web navigation site
Common d2d1.dll Errors
- Address access conflict – d2d1.dll.
- d2d1.dll not found.
- Cannot find C:\Windows\SysWOW64\d2d1.dll.
- Cannot register d2d1.dll.
- Cannot start Microsoft Office Access 2010. A required component is missing: d2d1.dll. Please reinstall Microsoft Office Access 2010.
- Cannot load d2d1.dll.
- The application cannot start because d2d1.dll is not found.
- The file d2d1.dll is missing or corrupted.
- This application cannot start because d2d1.dll is not found. Reinstalling the application may resolve this issue.
How to fix the missing d2d1.dll?
Method 1: Reinstall the Application
- Go to the Control Panel, find the application that’s causing the error, and uninstall it.
- Download the latest version of the application from a reliable source and install it. This process may restore the missing d2d1.dll file.
Method 2: Copy d2d1.dll to the application’s installation directory
- Exit the application or game displaying the .dll error.
- Download the DLL file from a safe website on the internet. It is generally downloaded as a zip file.
- Extract the contents of the zip file to any location on your computer. Once extracted, you will find the d2d1.dll file within it.
- Copy this file to the installation directory of the program or game that requires it.
Now launch the application to check if the issue has been resolved. If the D2D1.DLL error still occurs, please re-register d2d1.dll.
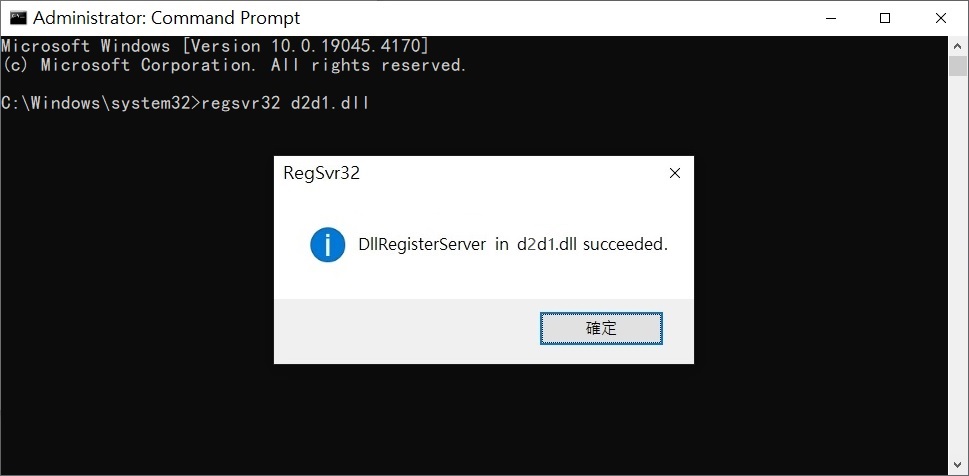
Method 3: Use REGSVR to register d2d1.dll
REGSVR is a command-line utility in Windows used to register and unregister DLL files. We will use it to register the DLL file downloaded from this page.
- Locate d2d1.dll; generally, it is in your system directory. The location of the system directory depends on the DLL architecture and your operating system:
- On Windows 32-bit, the file should be in C:\Windows\System32.
- On Windows 64-bit, the file should be stored in C:\Windows\SysWOW64.
- Open Command Prompt, right-click on it, and select “Run as administrator.”
- Type the following command and press Enter:
regsvr32 d2d1.dll. If you are registering a 32-bit DLL on a 64-bit Windows, enter the following command:regsvr32 c:\windows\syswow64\d2d1.dll

Restart your computer and open the application or game to check if the issue has been resolved.
Method 4: Using a Dedicated DLL Repair Tool
If the methods mentioned earlier seem cumbersome, utilizing a DLL repair tool can be a convenient option. This tool will allow you to easily fix the missing d2d1.dll file.
Please follow the steps below to restore d2d1.dll using Bitwar DLL Fixer:
Bitwar DLL Fixer Official: https://www.bitwarsoft.com/dll-fixer
Free Download Bitwar DLL Fixer:


Repairing d2d1.dll with Bitwar DLL Fixer
Full Repair/System DLL Repair:
- Download and launch Bitwar DLL Fixer. From the left-hand menu, select “Full Repair” or “System DLL Repair.”
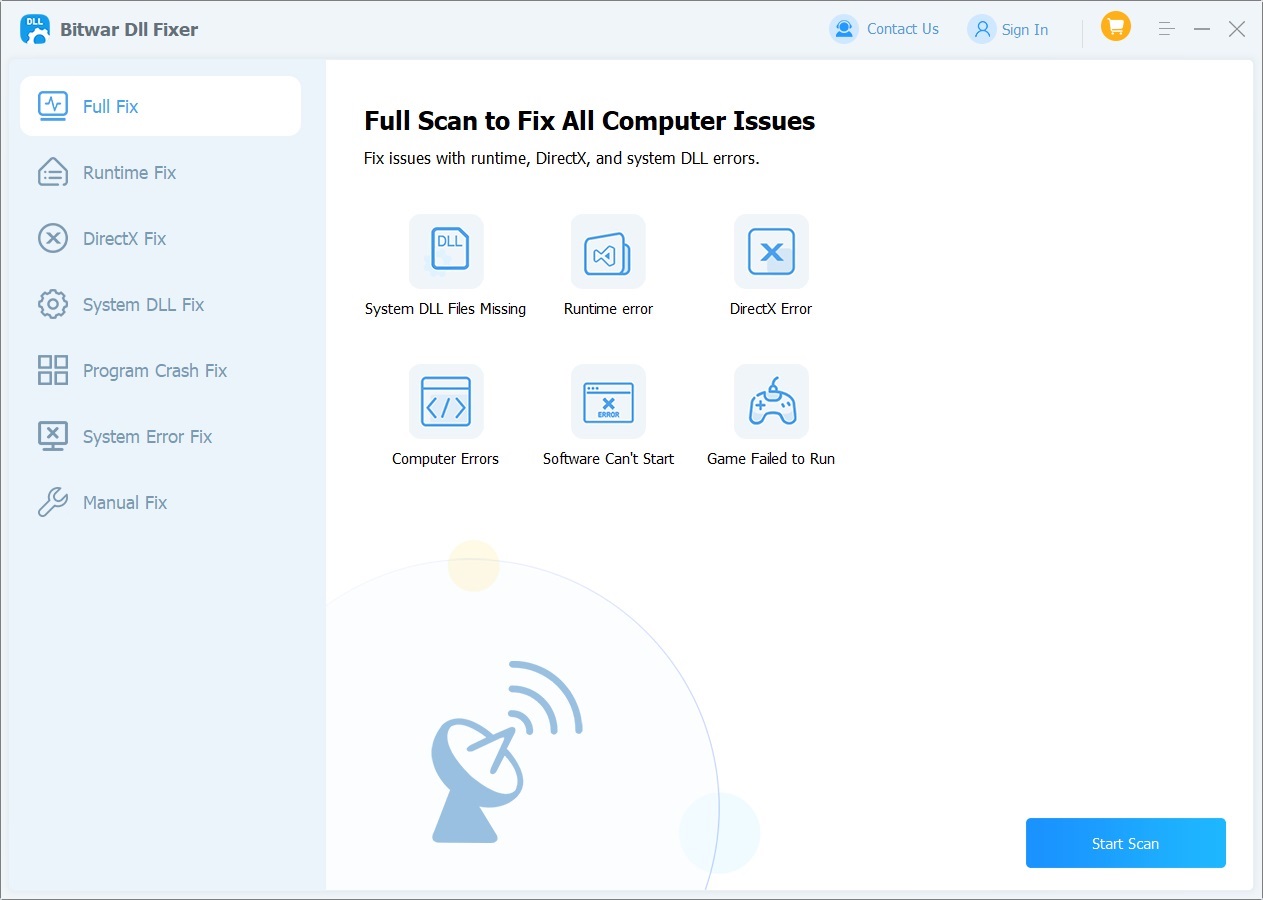
- Click on “Start Scan” and wait for the scan to complete. After reviewing the listed DLL files, click the “Repair” button to fix the problematic DLL files.
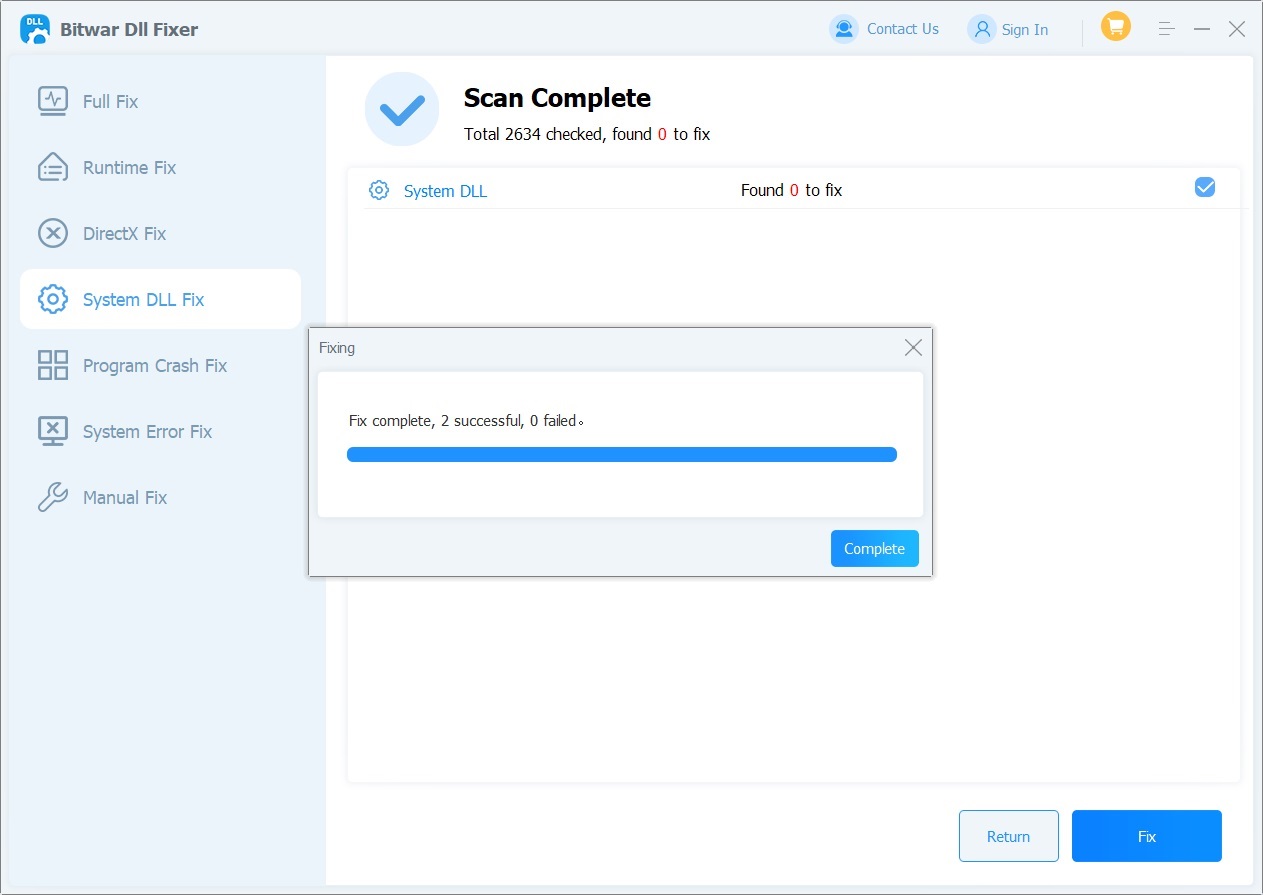


Once the repair is complete, a notification will appear on the screen. Following that, please launch the relevant program to verify if the d2d1.dll issue has been resolved.
Ps: If the d2d1.dll file you wish to repair cannot be found through “Full Repair” or “DirectX Repair,” you may attempt a manual repair.
Manual Repair:
- Click on “Manual Repair” and enter the name of the DLL and the save path for the DLL. Then, click on “Start Scan.”
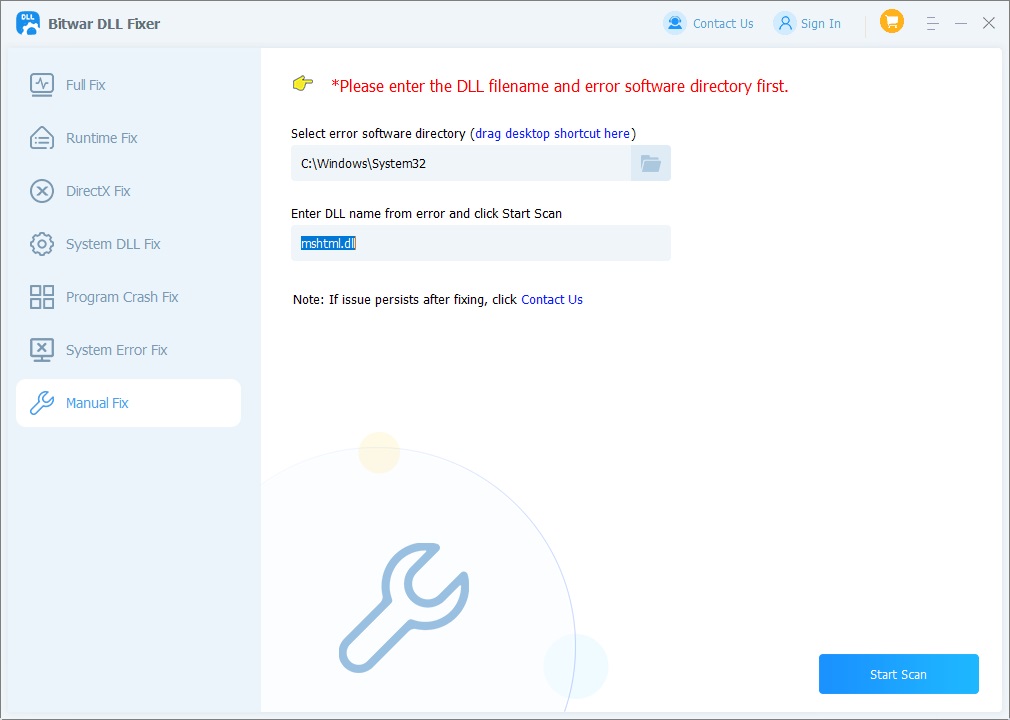
- Select the appropriate version for your computer and click “Repair.”
- After the repair is complete, please restart your computer.

Method 5: Update Windows
Many d2d1.dll error messages can be caused by an outdated Windows operating system. To run Windows Update, follow these simple steps:
- Click the Start button on Windows, type “update” in the search box, and press Enter.
- In the Windows Update window, click on “Check for updates” (you may see a similar button depending on the version of Windows you are using).
- If updates are available for download, click on “Install updates.”
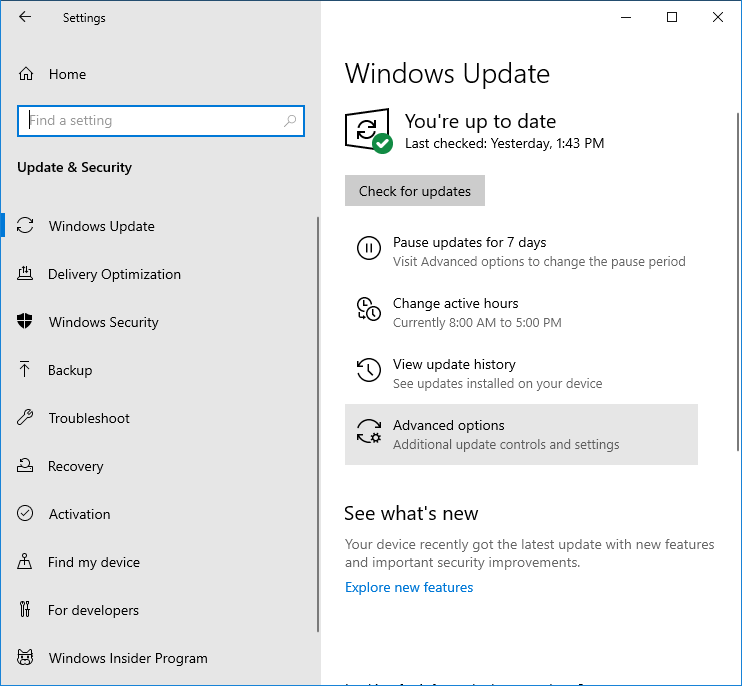

Once the updates are complete, restart your computer.
Method 6: Scan for Malware
Use Antivirus Software: Perform a full scan using your antivirus software to check for any malware that may have affected system files, including d2d1.dll.
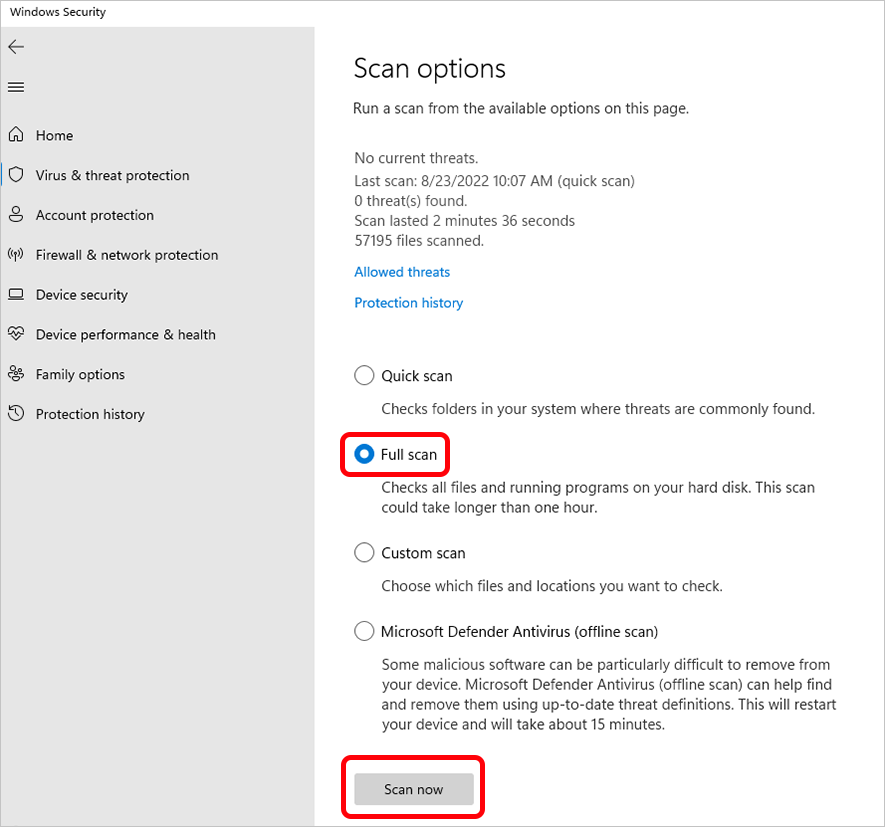
Using Windows Defender (Built-in Antivirus):
-
- Click on the Start menu and type “Windows Security” in the search bar, Click on the Windows Security app from the search results to open Windows Security.
- In the Windows Security window, click on Virus & Threat Protection.
- Run a Quick Scan: Click on the Quick scan button to check for any immediate threats. Wait for the scan to complete. It will show you if any threats are found.
- Run a Full Scan: For a more thorough check, scroll down and click on Scan options. Select Full scan and then click Scan now. This will take longer but will check all files and programs.
- After the scan completes, review the results. If malware is detected, follow the prompts to quarantine or remove the threats.

You can also use third-party antivirus software. Make sure to choose reputable antivirus programs (such as Norton, McAfee, Bitdefender, or Kaspersky) and install them. Ensure that they are updated to the latest virus definitions. Once completed, the software will notify you of any detected threats. Follow the provided instructions to handle the threats (quarantine, delete, etc.).
After scanning for malware, it’s a good practice to restart your computer. Always keep your antivirus and anti-malware software updated to ensure ongoing protection against new threats. Regularly scanning your system can help keep your computer safe and running smoothly.
Method 7: System Restore
Use System Restore: If you recently started experiencing the issue, you can revert your system to a previous restore point. Here are the steps to use System Restore in Windows to revert your computer to a previous state:
- Click on the Start menu and type Control Panel. Press Enter.
- In the Control Panel, click on System and Security.
- Click on System to open the System window.
- On the left sidebar, click on System protection. This will open the System Properties window.
- In the System Properties window, under the System Protection tab, click on the System Restore button.
- Click Next on the System Restore wizard.
- You will see a list of available restore points. Choose a restore point that is dated before the problems began. You can also check the box that says “Show more restore points” if you don’t see your desired point.
- Click Next and review your selected restore point. Then click Finish to confirm.
- A warning message will appear, informing you that once started, System Restore cannot be interrupted. Click Yes to proceed.
- Your computer will restart, and the restoration process will begin. This may take some time, so be patient.
- After the restoration is complete, your computer will boot up normally. You can check if the issues have been resolved.
Conclusion
After trying the above methods, restart your computer and check if the d2d1.dll error has been resolved. If you want to fix multiple missing DLL files on your computer at once, you can directly use Bitwar DLL Fixer. This tool allows you to fix all software and game errors on your computer at once, easily resolving DLL issues, running libraries, DirectX failures, and more.